By: CS2113-AY1819S1-F09-2 Since: Aug 2018 Licence: MIT
1. Introduction
The Restaurant Management System (RMS) provides restaurants with a more efficient way to manage their operations. It has a wide variety of features which cater to different roles in a restaurant. In line with Singapore’s "Smart Nation" movement, the RMS aims to digitise the restaurant business and make day-to-day operations smoother and simpler. Jump to Section 2, “Setting up” to get started with the development.
2. Setting up
2.1. Prerequisites
-
JDK
9or later -
IntelliJ IDE
2.2. Setting up the project in your computer
-
Fork this repo, and clone the fork to your computer
-
Open IntelliJ (if you are not in the welcome screen, click
File>Close Projectto close the existing project dialog first) -
Set up the correct JDK version for Gradle
-
Click
Configure>Project Defaults>Project Structure -
Click
New…and find the directory of the JDK
-
-
Click
Import Project -
Locate the
build.gradlefile and select it. ClickOK -
Click
Open as Project -
Click
OKto accept the default settings -
Open a console and run the command
gradlew processResources(Mac/Linux:./gradlew processResources). It should finish with theBUILD SUCCESSFULmessage.
This will generate all resources required by the application and tests.
2.3. Verifying the setup
-
Run the
seedu.addressbook.Mainand try a few commands -
Run the tests to ensure they all pass.
2.4. Configurations to do before writing code
2.4.1. Configuring the coding style
This project follows oss-generic coding standards. IntelliJ’s default style is mostly compliant with ours but it uses a different import order from ours. To rectify,
-
Go to
File>Settings…(Windows/Linux), orIntelliJ IDEA>Preferences…(macOS) -
Select
Editor>Code Style>Java -
Click on the
Importstab to set the order-
For
Class count to use import with '*'andNames count to use static import with '*': Set to999to prevent IntelliJ from contracting the import statements -
For
Import Layout: The order isimport static all other imports,import java.*,import javax.*,import org.*,import com.*,import all other imports. Add a<blank line>between eachimport
-
Optionally, you can follow the UsingCheckstyle.adoc document to configure Intellij to check style-compliance as you write code.
2.4.2. Updating documentation to match your fork
After forking the repo, the documentation will still have the SE-EDU branding and refer to the se-edu/addressbook-level4 repo.
If you plan to develop this fork as a separate product (i.e. instead of contributing to se-edu/addressbook-level4), you should do the following:
-
Configure the site-wide documentation settings in
build.gradle, such as thesite-name, to suit your own project. -
Replace the URL in the attribute
repoURLinDeveloperGuide.adocandUserGuide.adocwith the URL of your fork.
2.4.3. Setting up CI
Set up Travis to perform Continuous Integration (CI) for your fork. See UsingTravis.adoc to learn how to set it up.
After setting up Travis, you can optionally set up coverage reporting for your team fork (see UsingCoveralls.adoc).
| Coverage reporting could be useful for a team repository that hosts the final version but it is not that useful for your personal fork. |
Optionally, you can set up AppVeyor as a second CI (see UsingAppVeyor.adoc).
| Having both Travis and AppVeyor ensures your App works on both Unix-based platforms and Windows-based platforms (Travis is Unix-based and AppVeyor is Windows-based) |
2.4.4. Getting started with coding
When you are ready to start coding,
-
Get some sense of the overall design by reading Section 3, “Design”.
3. Design
3.1. Architecture
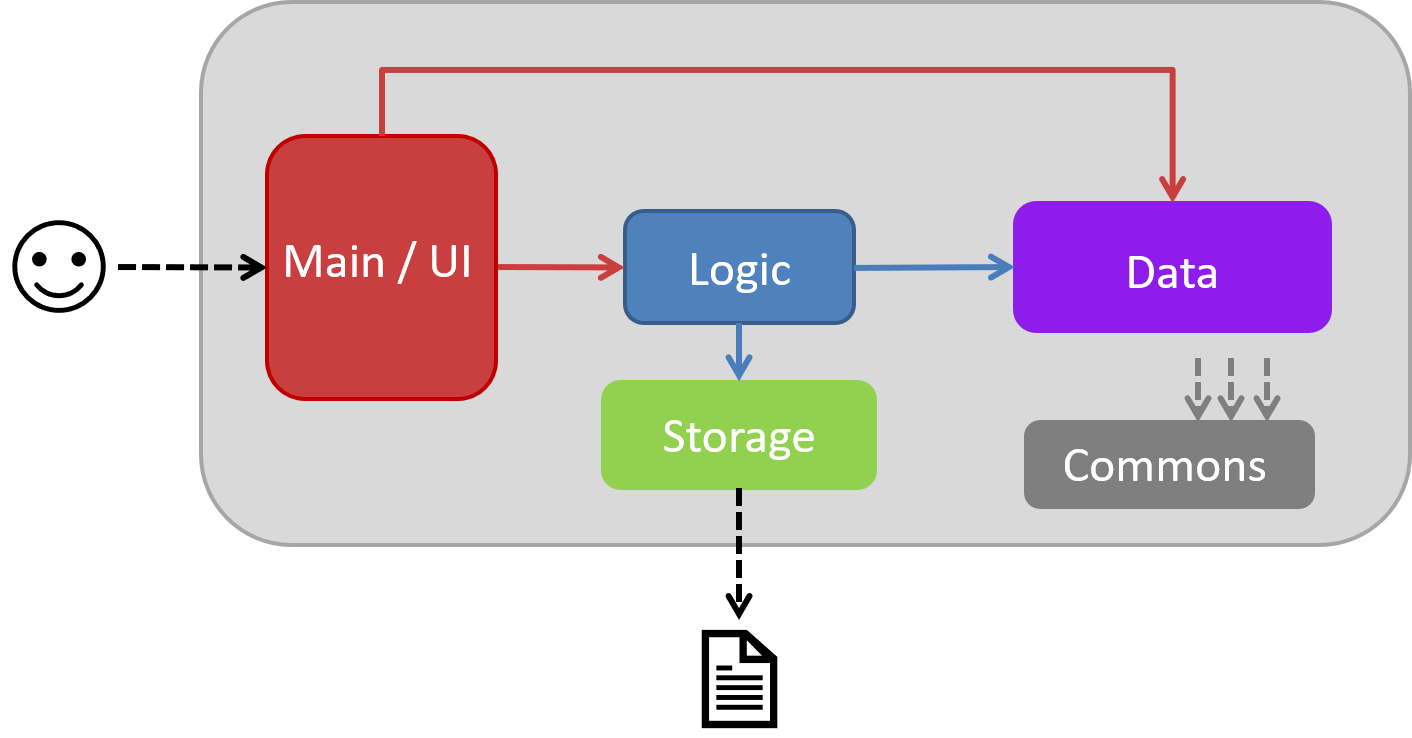
The Architecture Diagram given above explains the high-level design of the App. Given below is a quick overview of each component.
-
At app launch: Initializes the components in the correct sequence, and connects them up with each other.
-
At shut down: Shuts down the components and invokes cleanup method where necessary.
Commons represents a collection of classes used by multiple other components. Two of those classes play important roles at the architecture level.
-
Messages: Used by many classes to write user visible message. -
Utils: Contains all the utility methods. -
Name: The parent class to the MemberName and EmployeeName classes. -
EmailThe parent class to the MemberEmail and EmployeeEmail classes.
The rest of the App consists of four key components.
Below contains the description for each of the four key components:
3.2. UI component
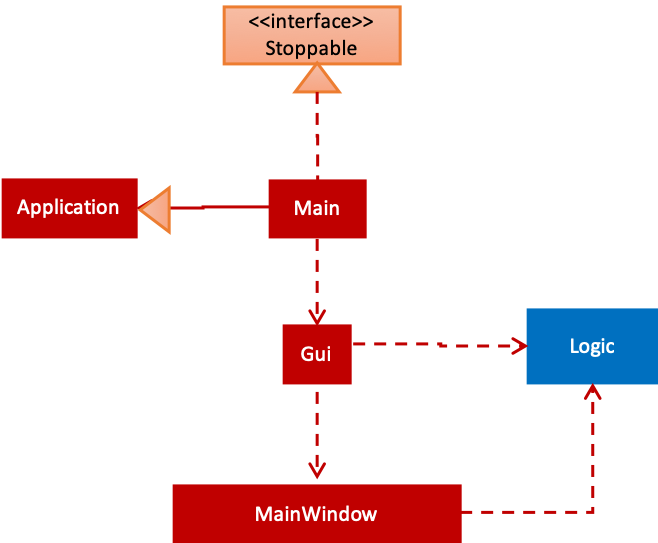
The UI consists of Main that implements Stoppable and extends Application. Main is also dependent on Gui which is dependant on MainWindow.
Furthermore, Gui and MainWindow are both dependent on Logic.
The components use JavaFx UI framework.
The Main component,
-
Executes user commands using the
Guicomponent which relies on theLogiccomponent.
3.3. Logic component
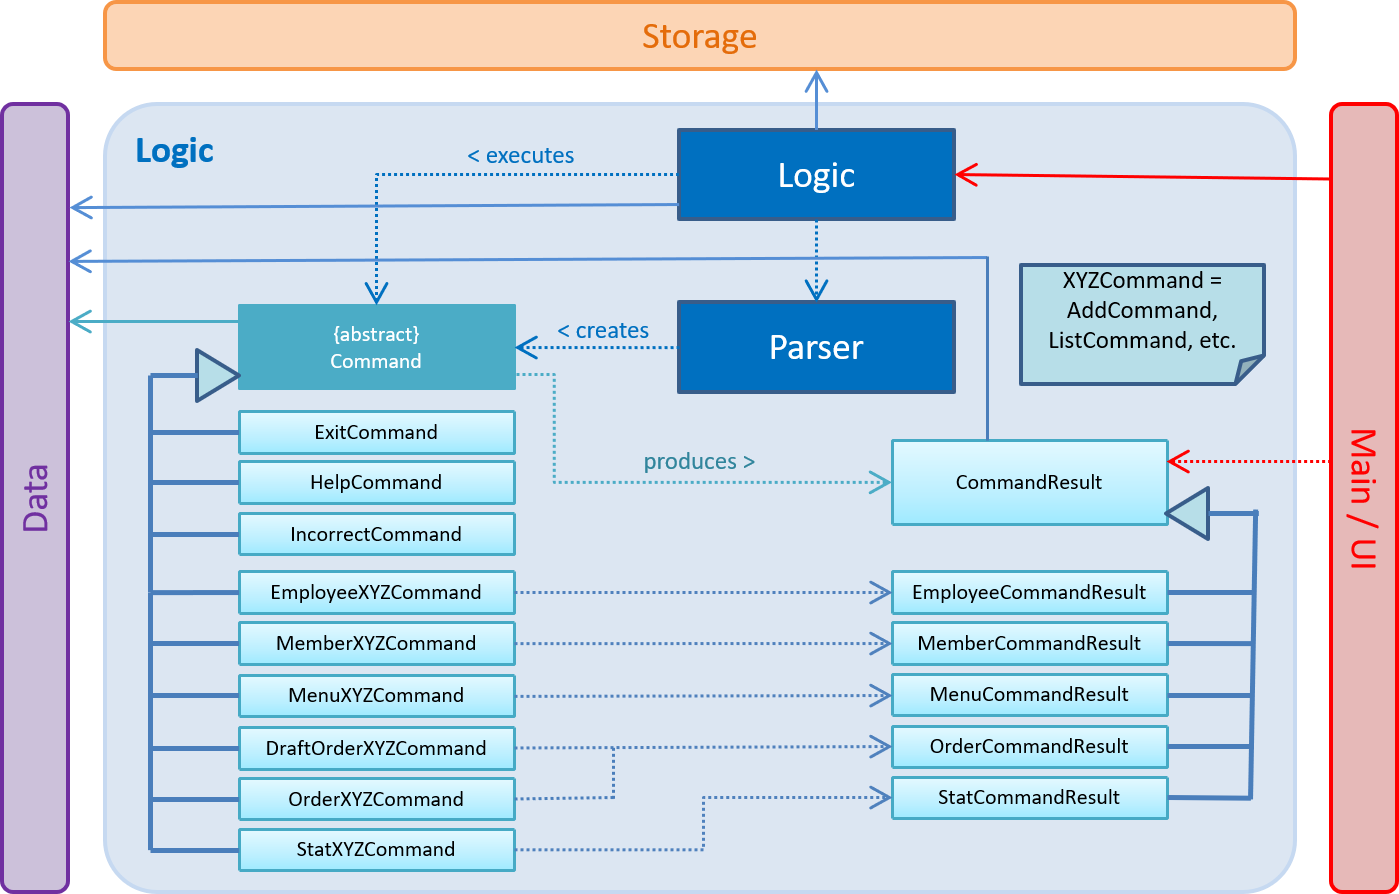
API :
Logic.java
-
Logicuses theParserclass to parse the user command. -
This results in a
Commandobject which is executed byLogic. -
The command execution can affect the
Data(e.g. adding a new member) and/or raise events. -
The result of the command execution is encapsulated as a
CommandResultobject which is passed back to theUi.
Each of the CommandResult class is used as a specific constructor to correctly handle the class of the returned list
of result.e.g. OrderCommandResult constructs a CommandResult object that only contains a result message and a list of orders
generated from the ordering commands.
|
3.4. Data component
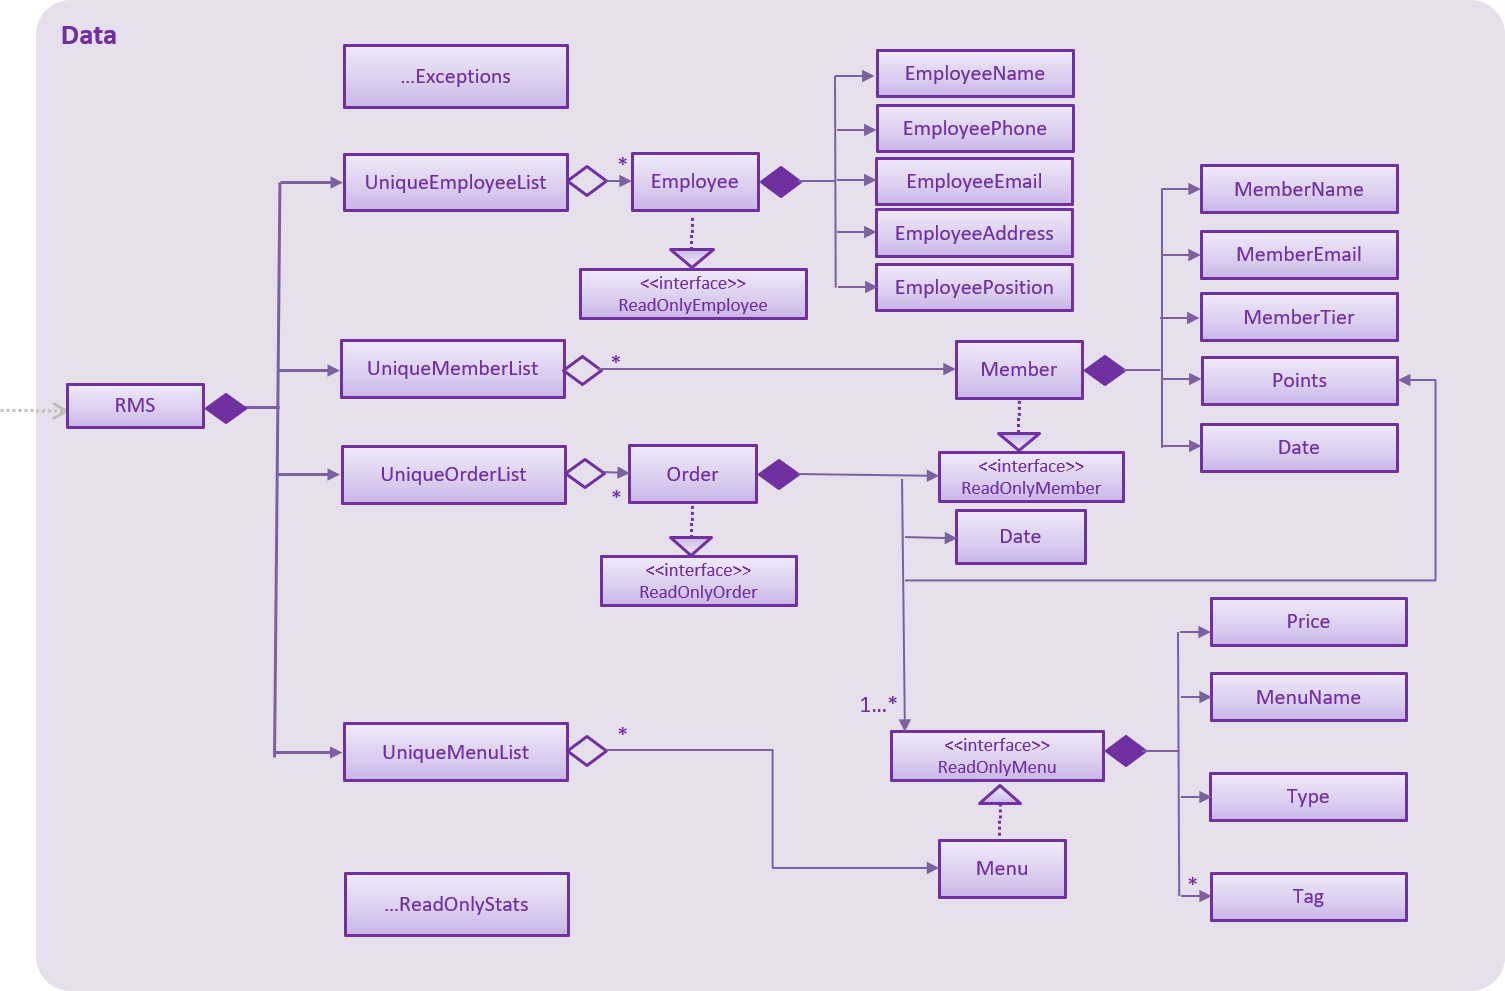
API :
data
-
The Data stores the RMS data
-
It does not depend on any of the other components
| As a more OOP model, we can store a Tag list in RMS, which all the relevant features can reference. This would allow RMS to only require one Tag object per unique Tag, instead of each feature needing their own Tag object. |
3.5. Storage component
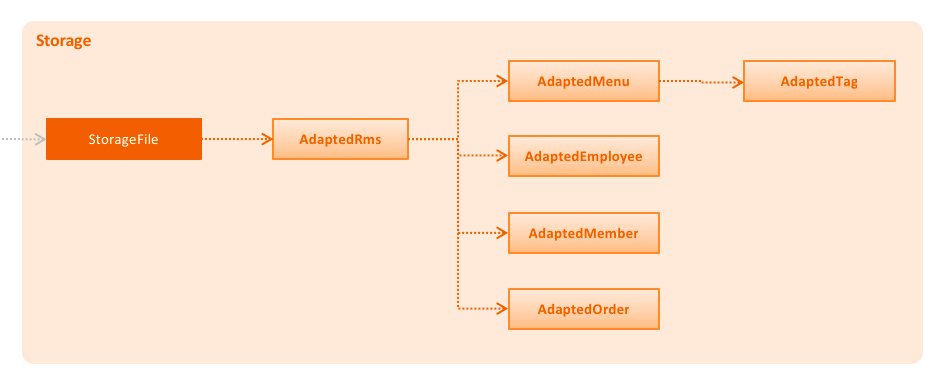
API : StorageFile.java
The Storage component,
-
This component saves the RMS data in an XML format and is also able to load the XML back into data.
4. Implementation
This section describes some noteworthy details on how certain features are implemented.
4.1. Adding a new order
To avoid writing a long command line when ordering a long list of dishes, a draft order system was implemented.
-
When the ordering draft is initialized or cleared, the member
draftOrderinRms.txtis loaded with a new object of classOrder. It is initialize with an empty list of dish and a pseudo-empty customer field that is notnull. -
By using the draft order command classes, the ordering draft can be edited (e.g. picking the customer from the member list if they present their membership card, pick the dish from the menu list one by one before confirming the order).
-
Once an order is confirmed, the ordering time is recorded and the total price is calculated to create a new
Orderobject that has the same customer and list of dishes fields as the ordering draft to be added to the order list, the member points of the customer is updated, and the ordering draft is cleared afterward.
4.2. Providing the option for members to accumulate and redeem points
To allow members in the RMS to accumulate and redeem points when an order is made, the command draftpoints was implemented.
-
As long as the customer and list of dish fields are not empty, the command
draftpointscan be used to add a Points object from the Member class into the draft order. A new Points object will be created to store the points that the user wishes to redeem. Once the order is confirmed, the Points object in the Member class that was added by using thedraftcustomercommand will be updated. The member list will then show the newly updated points of that member while the order list will reflect the points that the member has earned from the order. The final price of the order will be calculated based on the price of each dish multiplied by the quantity and also take into account the number of points redeemed.
4.3. Saving and Loading the order list
The order list is saved by using an adaptive class that convert the existing data in the objects to a jaxb-friendly class. This means that the order list stores every information of the owner of an order.
However, the loading the order list cannot be implemented by creating a list of new Order objects that contains a new
Member object in its customer field based on the data stored in the storage file. This is because the created
customer object are not the same object as the original Member object in the member list, so any changes made to the
member list will not get reflected in the order (e.g. not showing the changes of address or phone number if these
fields are to be recorded to the membership database).
To solve this problem, the order list will retrieve the correct object in the loaded member list at the start of the
program using the method retrieveMember() in AdaptedOrder.java.
4.4. [Proposed] Program State Control
As there is multiple functionality in the program, it is proposed that a program state control functionality should be implemented to assist the user navigate through the program. The command keywords can be simplified and the help message can be specifically wrote in each states to reduce the burdens of remembering very long line of commands.
This can be done by introducing a status variable in the Logic module, creating command to change the state variable
and adjusting the returning command in the Parser based on that variable.
4.5. Statistics
4.5.1. Displaying Tables
As RMS is a CLI (Command Line Interface) based program, we are not able to display any graphical tables to the users. However, the alternative to this is to print out the tables in an Ascii format. Therefore, the AsciiTable class is created. This class helps to format any data into a string that is able to display as an AsciiTable.
In order to display this table correctly, the font being used in the results windows needs to be a monospaced* font.
*Monospaced fonts refer to fonts with every characters having equal width size.
4.5.2. Calculating Menu Statistics
The way the statistics for menu items are calculated is by iterating through the list of orders and incrementing a counter for each unique menu items every time it is sold. These counters are then sorted in ascending order and it will print the menu item with the most sales and the one with the least sales for the best sellers and the unpopular items respectively.
5. Documentation
We use asciidoc for writing documentation.
5.1. Site Template
The files in docs/stylesheets are the CSS stylesheets of the site.
You can modify them to change some properties of the site’s design.
The files in docs/templates controls the rendering of .adoc files into HTML5.
These template files are written in a mixture of Ruby and Slim.
|
Modifying the template files in |
6. Testing
6.1. Running Tests
There are three ways to run tests.
Method 1: Using IntelliJ JUnit test runner
-
To run all tests, right-click on the
src/test/javafolder and chooseRun 'All Tests' -
To run a subset of tests, you can right-click on a test package, test class, or a test and choose
Run 'ABC'
Method 2: Using Gradle
-
Open a console and run the command
gradlew clean allTests(Mac/Linux:./gradlew clean allTests)
Method 3: Manual testing
-
Go to our github release page and download
Rms.jarandRms.txt -
Put them into the same folder and run
Rms.jarand confirm that the program is running with pre-populated data -
Rms.txtis populated with existing data, which allows testers to test the program using the data inRms.txt -
Test the program using the user and the developer guide
| See UsingGradle.adoc for more info on how to run tests using Gradle. |
6.2. Types of tests
We have 1 type of test:
-
Non-GUI Tests - These are tests not involving the GUI. They include,
-
Unit tests targeting the lowest level methods/classes.
e.g.seedu.addressbook.commons.UtilsTest -
Integration tests that are checking the integration of multiple code units (those code units are assumed to be working).
e.g.seedu.addressbook.storage.StorageFileTest
seedu.addressbook.parser.ParserTest -
Hybrids of unit and integration tests. These test are checking multiple code units as well as how the are connected together.
e.g.seedu.addressbook.logic.LogicTest
-
7. Dev Ops
7.1. Build Automation
See UsingGradle.adoc to learn how to use Gradle for build automation.
7.2. Continuous Integration
We use Travis CI and AppVeyor to perform Continuous Integration on our projects. See UsingTravis.adoc and UsingAppVeyor.adoc for more details.
7.3. Coverage Reporting
We use Coveralls to track the code coverage of our projects. See UsingCoveralls.adoc for more details.
7.4. Documentation Previews
When a pull request has changes to asciidoc files, you can use Netlify to see a preview of how the HTML version of those asciidoc files will look like when the pull request is merged. See UsingNetlify.adoc for more details.
7.5. Making a Release
Here are the steps to create a new release.
-
Update the version number in
MainApp.java. -
Generate a JAR file using Gradle.
-
Tag the repo with the version number. e.g.
v0.1 -
Create a new release using GitHub and upload the JAR file you created.
Appendix A: Product Scope
Target user profile:
-
has a need to manage a restaurant with high volume of orders
-
prefer desktop apps over other types
-
can type fast
-
prefers typing over mouse input
-
is reasonably comfortable using CLI apps
Value proposition: manage restaurant faster than a typical mouse/GUI driven app
Appendix B: User Stories
Priorities: High (must have) - * * *, Medium (nice to have) - * *, Low (unlikely to have) - *
| Priority | As a … | I want to … | So that I can… |
|---|---|---|---|
|
Cashier |
add, edit and delete orders made |
collate the customer’s orders and send it to the kitchen |
|
Cashier |
add new members, delete old members and view all members of the restaurant |
keep track of which customer has a membership at the restaurant |
|
Cashier |
view all existing menu items of the restaurant |
know which item the customer wants when taking an order |
|
Cashier |
view the recommended items in the menu |
suggest customers on what to order of needed |
|
Cashier |
search for a menu item |
find a particular item easily without viewing the menu lists |
|
Manager |
keep track of the restaurant business statistics such as daily revenue |
understand if the restaurant is making a loss or not |
|
Manager |
keep track of employees wages |
know how much I have to pay or how much I have paid to restaurant employees |
|
Manager |
keep track of which menu item are sold the most |
know which food is the best seller |
|
Manager |
add, edit and delete items from the menu |
keep my restaurant menu interesting |
|
Manager |
list employees |
to view the details of the employees working in the restaurant |
|
Manager |
add, edit and delete employees from the system |
to manage information of the employees working in the restaurant |
|
Chef |
view all the orders made |
know which order I need to prepare next |
|
Chef |
update the order status |
let the customers know that their orders are ready |
|
Employee |
clock in and clock out attendance |
account for the time period which I am working |
{More to be added}
Appendix C: Use Cases
(For all use cases below, the System is the Restaurant Management System (RMS), unless specified otherwise)
Use case: Taking a Customer’s Orders
Actor: Manager and Cashier
MSS
-
User chooses to view the menu list
-
FMS shows the list of items in the menu
-
User informs the menu item and the quantity they wish to order
-
FMS put that item and its quantity in the order
-
Repeat step 1 to 4 until user confirm the order
-
FMS acknowledge the order and add it to the system
Use case ends.
Extensions
-
1a. If a customer is in the restaurant’s member list, user can record them in the order so that bonus points can be accumulated when the order is confirmed.
Return to step 1.
-
2a. Menu list too long or does not have what the customer exactly wants
-
2a1. User enters the find command and searches for the item customer is looking for
2a2. FMS returns the list of items searched by the command the user entered
Return to step 3.
-
Use case: Show Main Menu
System: Restaurant Management System (RMS)
Use Case: Show Main Menu
Actor: Manager, Cashier
MSS
-
User chooses to view the Main Menu to see the categories of menu item available.
-
RMS shows Main Menu of the restaurant.
Use case ends.
Use case: List Menu Based On Category
System: Restaurant Management System (RMS)
Use Case: List employees
Actor: Manager, Cashier
Preconditions: User executes the Show Main Menu use case to know the existing menu categories.
Guarantees:
-
List of menu items of a particular category will be displayed.
MSS
-
User requests to list menu items of a particular category.
-
RMS displays a list of the menu items of that category.
Use case ends.
Extensions
-
1a. RMS detects that an invalid type has been entered.
-
1a1. RMS displays an error message stating what the valid item types are.
Use case ends.
-
Use case: List Menu To View All Menu Items
System: Restaurant Management System (RMS)
Use Case: List employees
Actor: Manager, Cashier
Guarantees:
-
Displays list of menu items that exists in the menu database.
MSS
-
User requests to view all the menu items of the menu database, not just based on their categories.
-
RMS displays all the menu items that exist in the restaurant’s database.
Use case ends.
Use case: Add Menu
Actor: Manager
Preconditions: List Menu By Type command should be executed prior to this use case.
Guarantees:
-
New menu item is added to the RMS.
MSS
-
User requests to add a new menu item with the required parameters.
-
RMS adds a new menu item to the existing menu list with the parameters that were specified by the User.
Use case ends.
Extensions
-
1a. RMS detects that an invalid command format has been entered.
-
1a1. RMS displays an error that says the command format is invalid.
-
1a2. RMS displays information on the proper use of the command along with an example.
Use case ends.
-
-
1b. RMS detects that the new menu item to be added has the same name as one of the exisitng menu items.
-
1b1. RMS detects this as an an attempt to add a duplicate menu item.
-
1b2. RMS displays an error that says the employee already exists in Rms.
Use case ends.
-
-
1c. RMS detects that the price field entered is invalid.
-
1c1. RMS dispays an error message stating the appropriate price field argument to be entered.
Use case ends.
-
-
1d. RMS detects that the type field entered is invalid.
-
1d1. RMS dispays an error message stating what the valid item types are.
Use case ends.
-
Use case: Delete menu
Actor: Restaurant Manager
Preconditions: List Menu By Type or Find Menu use case should be executed prior to this use case this use case.
Guarantees:
-
The specified menu item will be deleted from the RMS.
MSS
-
User requests to delete menu item by using the index as shown on the list of menu items.
-
RMS deletes a menu item of the specified index.
Use case ends.
Extensions
-
1a. RMS detects that an invalid index has been entered.
-
1a1. RMS displays an error that says the index provided is invalid.
Use case ends.
-
Use case: Find Menu
System: Restaurant Management System (RMS)
Use Case: Find Menu
Actor: Cashier
MSS
-
User chooses to find menu items containing some keywords.
-
RMS shows the menu items that contain those keywords.
Use case ends.
Use case: Menu Recommendations
System: Restaurant Management System (RMS)
Use Case: Menu Recommendations
Actor: Cashier
MSS
-
User chooses to view the recommended items from the different categories.
-
System displays the best seller items from each category as recommendations.
Use case ends.
Use case: List employees
System: Restaurant Management System (RMS)
Use Case: List employees
Actor: Restaurant Manager
Preconditions: User has started up the system.
Guarantees:
-
List of employees will be displayed.
MSS
-
User requests to list employees.
-
RMS displays a list of the employees.
Use case ends.
Use case: Add employee
Actor: Restaurant Manager
Preconditions: "List employee" use case was used before this use case.
Guarantees:
-
New employee is added to the RMS.
MSS
-
User requests to add a new employee with the required parameters.
-
RMS adds a new employee to the list with the parameters that were specified by the User.
Use case ends.
Extensions
-
1a. RMS detects that an invalid command format has been entered.
-
1a1. RMS displays an error that says the command format is invalid.
-
1a2. RMS displays information on the proper use of the command along with an example.
Use case ends.
-
-
1b. RMS detects that there is an attempt to add a duplicate employee.
-
1b1. RMS displays an error that says the employee already exists in Rms.
Use case ends.
-
Use case: Delete employee
Actor: Restaurant Manager
Preconditions: "List employee" use case was used before this use case.
Guarantees:
-
The specified employee will be deleted from the RMS.
MSS
-
User requests to delete an employee by using the index as shown on the list of employees.
-
RMS deletes an employee using the specified index.
Use case ends.
Extensions
-
1a. RMS detects that an invalid index has been entered.
-
1a1. RMS displays an error that says the index provided is invalid.
Use case ends.
-
Use case: Edit employee
Actor: Restaurant Manager
Preconditions: "List employee" use case was used before this use case.
Guarantees:
-
Details of an employee is edited.
MSS
-
User requests to edit an existing employee at the specified index with the optional parameters provided.
-
RMS edits the employee at the specified index with the optional parameters that were provided.
Use case ends.
Extensions
-
1a. RMS detects that an invalid command format has been entered.
-
1a1. RMS displays an error that says the command format is invalid.
-
1a2. RMS displays information on the proper use of the command along with an example.
Use case ends.
-
-
1b. RMS detects that an invalid index has been entered.
-
1b1. RMS displays an error that says the index provided is invalid.
Use case ends.
-
Use case: Employee clock in
Actor: Employee
Preconditions: User has started up the system.
Guarantees:
-
Details of the time that the employee clocks in will be added to the system.
MSS
-
User requests to record his/her clock in details into the system with his/her name.
-
RMS clocks in the user’s attendance based on the current date and time using his/her specified name.
Use case ends.
Extensions
-
1a. RMS detects that the user did not use the clock out command yet.
-
1a1. RMS displays an error that says the user has to clock out before clocking in.
-
1a2. RMS displays information on the proper use of the command along with an example.
Use case ends.
-
Use case: Employee clock out
Actor: Employee
Preconditions: User has started up the system.
Guarantees:
-
Details of the time that the employee clocks out will be added to the system.
MSS
-
User requests to record his/her clock out details into the system with his/her name.
-
RMS clocks in the user’s attendance based on the current date and time using his/her specified name.
Use case ends.
Extensions
-
1a. RMS detects that the user did not use the clock in command yet.
-
1a1. RMS displays an error that says the user has to clock in before clocking out.
-
1a2. RMS displays information on the proper use of the command along with an example.
Use case ends.
-
Use case: List member
System: Restaurant Management System (RMS)
Use Case: List member
Actor: Restaurant Manager / Cashier
Preconditions: User has started up the system.
Guarantees:
-
List of members will be displayed.
MSS
-
User chooses to view the entire list of members.
-
RMS displays a list of the employees.
Use case ends.
Use case: Add member
Actor: Restaurant Manager / Cashier
Preconditions: User has started up the system.
Guarantees:
-
New member is added to the RMS.
MSS
-
User requests to add a new member with the required parameters.
-
RMS adds a new member to the list with the parameters that were specified by the User.
Use case ends.
Extensions
-
1a. RMS detects that an invalid command format has been entered.
-
1a1. RMS displays an error that says the command format is invalid.
-
1a2. RMS displays information on the proper use of the command along with an example.
Use case ends.
-
-
1b. RMS detects that there is an attempt to add a duplicate member.
-
1b1. RMS displays an error that says the member already exists in Rms.
Use case ends.
-
Use case: Delete member
Actor: Restaurant Manager / Cashier
Preconditions: User has started up the system.
Guarantees:
-
Existing member is deleted from the RMS.
MSS
-
User requests to delete an existing member in the list of members.
-
RMS deletes the existing member at the index that was specified by the User.
Use case ends.
Extensions
-
1a. RMS detects that an invalid command format has been entered.
-
1a1. RMS displays an error that says the command format is invalid.
-
1a2. RMS displays information on the proper use of the command along with an example.
Use case ends.
-
-
1b. RMS detects that there is an attempt to delete a member that does not exist in the RMS.
-
1b1. RMS displays an error that says the member index provided is invalid.
Use case ends.
-
Use case: View employee statistics
Actor: Manager
MSS
-
User chooses to view the employee statistics
-
RMS shows overview employee statistics
Use case ends.
Use case: View member statistics
Actor: Manager
MSS
-
User chooses to view the member statistics
-
RMS shows overview member statistics
Use case ends.
Use case: View menu statistics
Actor: Manager
MSS
-
User chooses to view the menu statistics
-
RMS shows overview menu statistics
Use case ends.
Use case: View order statistics
Actor: Manager
MSS
-
User chooses to view the order statistics
-
RMS shows overview order statistics
Use case ends.
-
1a. RMS detects that there are currently no employees recorded.
-
1a1. RMS shows a message that says there are currently no employees recorded.
Use case ends.
-
{More to be added}
Appendix D: Non Functional Requirements
-
Quality requirement: The system should be efficient enough for restaurants which want to add a management system for their orders. The orders will be processed in less than 5 clicks.
-
Performance requirements: The system should respond within three seconds as speed and efficiency is important for a restaurant.
-
Project scope: The product is not developed for the customers of the restaurants to use.
{More to be added}